
Medical Claims Submission Process: Step-by-Step Guide
Submitting medical claims is more than just paperwork—it’s the core process that determines whether providers get paid on time. Every delay, error, or missing field directly impacts cash flow and increases the likelihood of denials. A well-structured medical claims submission process is therefore essential not only for providers but also for maintaining compliance with payer regulations.
This guide breaks the process into clear stages—data collection, coding, claim preparation, submission, and follow-up—so you can see exactly how each step connects to the bigger revenue cycle. By the end, you’ll know how claims flow, what to avoid, and how the Medical Billing & Coding Certification equips professionals to manage this process without costly errors.

Overview of the Medical Claims Lifecycle
The medical claims lifecycle is a structured, multi-phase journey that every claim travels—from initial patient intake to final reimbursement or denial. For providers, it’s not just paperwork—it’s the engine of revenue. A single breakdown at any point in this process can lead to denials, underpayments, or compliance issues. That’s why mastering the lifecycle isn’t optional for medical billers—it’s non-negotiable.
From Patient Visit to Claim Creation
The lifecycle begins at the moment a patient schedules or arrives for an appointment. Front-desk staff must capture complete demographic, insurance, and contact information. This includes verifying active coverage and noting any special billing instructions or secondary insurance. Errors at this stage create ripple effects throughout the rest of the process.
After the visit, clinical documentation becomes the core of the claim. Medical coders extract ICD-10/ICD-11 and CPT codes based on provider notes. If procedures weren’t documented correctly or codes are selected carelessly, the resulting claim is flagged for review—or outright denied. The cleaner the documentation and coding, the faster the claim moves forward.
Where Claims Fit in Revenue Cycle Management
Claims aren’t just paperwork—they are financial assets within the broader Revenue Cycle Management (RCM) framework. In RCM, every action from scheduling to final payment plays a role in converting services rendered into dollars collected.
Claims fall squarely in the mid-cycle, after front-end verification and before back-end collections. They are the “bridge” between providing care and receiving payment. If a claim is not coded properly, lacks modifiers, or gets stuck in a clearinghouse due to format issues, it delays this bridge—stalling cash flow and increasing administrative overhead.
Effective claims management ensures providers don’t just submit more claims—they submit smarter ones. It’s not just about volume; it’s about accuracy, completeness, and speed. When claims are optimized from the start, providers get reimbursed faster, and rework is minimized.
Mastering the lifecycle helps billing professionals spot breakdowns before they cost money. It also aligns the team with industry standards and payer-specific rules—giving organizations a true competitive edge in an increasingly complex billing landscape.

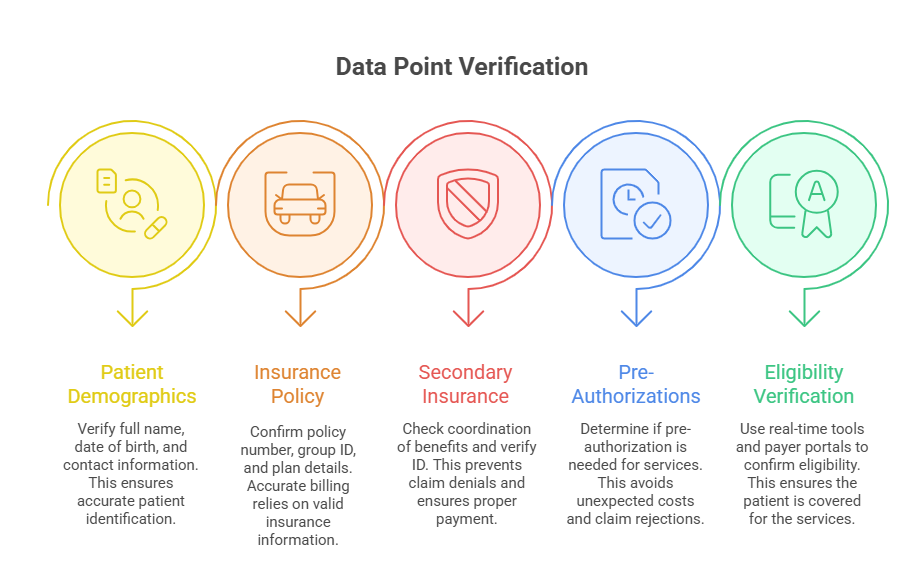
Gathering Accurate Patient and Insurance Data
Accuracy in data collection isn’t just a nice-to-have—it is the backbone of successful claims processing. Over 60% of initial claim denials stem from missing or incorrect patient or insurance details. That means every phone number, policy ID, and date of birth entered during intake either moves revenue forward or blocks it cold.
Importance of Front-End Verification
Front-end staff are the first line of defense. Their job isn’t just to welcome patients—it’s to verify eligibility, demographics, and insurance benefits in real time. This includes:
Confirming active coverage and plan details
Capturing policyholder name, relationship, and ID exactly as listed
Recording full address, contact information, and spelling accuracy
Many practices fail to use tools like electronic eligibility checks or real-time API integrations from clearinghouses, which are essential for reducing risk. Even one digit off on a policy number can bounce a claim. Solid front-end verification also includes validating secondary insurance to ensure correct coordination of benefits.
When this step is rushed or skipped, billing teams downstream must work backward, wasting hours reprocessing claims or calling patients after the fact—often after the timely filing window has passed.
Avoiding Common Data Entry Errors
Most errors are not complex—they’re avoidable. Manual entry leads to:
Misspelled patient names that don’t match insurance records
Incorrect DOBs or gender codes
Transposed policy or group numbers
Missing authorization numbers
Each of these will trigger a rejection or delay, and when multiplied over dozens of claims, the revenue loss is exponential. To reduce this:
Use dropdown menus where possible to standardize entries
Implement double-entry validation or review by a second team member
Regularly train front-desk teams on payer-specific input standards
Internal audits every quarter help flag patterns of recurring mistakes and can be built into a continuous improvement cycle.
Eligibility Checks and Pre-Authorizations
Real-time eligibility checks are the single most effective way to avoid coverage-related denials. These should be run before every visit—not just for new patients. High-risk services (like imaging or surgeries) often require pre-authorizations. If not obtained and noted in the EHR or PMS, the claim may get denied regardless of coverage.
Verifying benefits and checking authorization requirements upfront saves time, protects revenue, and improves patient satisfaction by avoiding surprise bills.
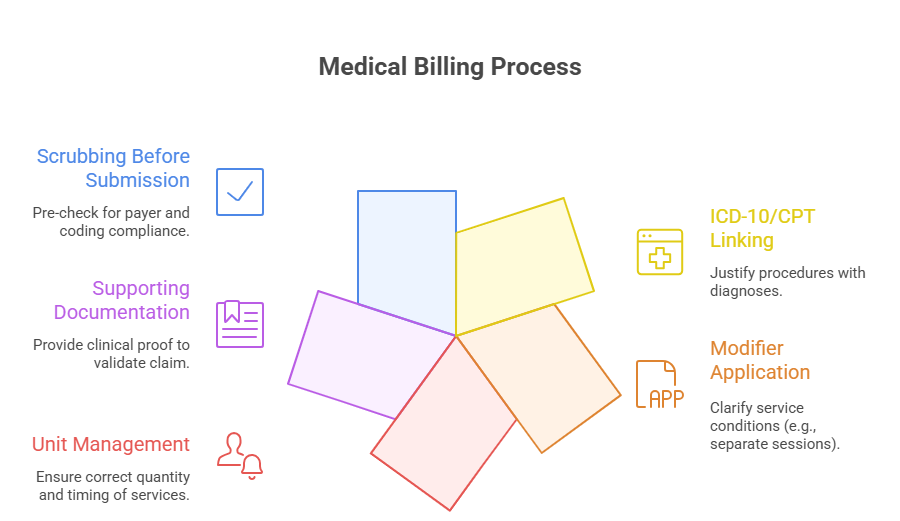
Preparing and Coding the Claim
Once patient and insurance data are verified, the next critical step is translating the clinical encounter into billable codes. This is where the revenue cycle either accelerates—or gets derailed. Claims built on vague notes, incorrect coding, or incomplete documentation are destined for denial, delay, or underpayment. Certified medical coders ensure each claim reflects the care delivered, coded to the highest specificity, and aligned with payer rules and federal guidelines.
Linking ICD-10/ICD-11 and CPT Codes
ICD-10 and CPT codes serve different but connected functions. ICD-10 (or ICD-11 in select international markets) identifies why the patient received care—diagnoses and symptoms. CPT codes define what was done—procedures, tests, or services.
Here’s where accuracy matters: each CPT code must correlate logically with an ICD code. For example, billing a chest X-ray CPT code without a corresponding respiratory diagnosis in ICD-10 will likely trigger rejection for lack of medical necessity.
Proper linkage means:
Selecting the most specific ICD-10 codes—not generic categories
Ensuring each CPT code is justified by documentation and necessity
Reviewing local coverage determinations (LCDs) for code compatibility
Automated claim scrubbers can help, but only trained coders can make judgment calls on code hierarchy and priority.
Using Modifiers and Units Correctly
Modifiers clarify services that were altered without changing their definition. Misusing them—or omitting them—leads to denials or payment at lower-than-expected rates. For example:
Modifier -25 is crucial for same-day evaluation and procedures
Modifier -59 distinguishes bundled services
Incorrect unit counts (e.g., injections, time-based codes) will throw up red flags
Each payer has different modifier acceptance rules, so blindly copying past claims is risky. Coders should reference payer-specific guidance and double-check the following:
Units match duration, quantity, or dosage
Modifiers are applied in correct order and position
Claims requiring multiple modifiers (e.g., -59 with -LT/-RT) are formatted properly
Batch coding errors here are a silent revenue killer—often overlooked until a post-payment audit.
Attaching Supporting Documentation
Certain services demand attachments—chart notes, operative reports, lab results, or signed authorizations. These should be added at the time of claim generation—not as an afterthought.
Include supporting documents in payer-required formats (PDF, TIFF, etc.)
Match documentation to the exact service and date listed in the claim
Upload through the PMS or clearinghouse at the time of submission
Missing documentation can delay a clean claim for weeks. Worse, it may trigger payer-side medical reviews that stall reimbursement indefinitely.
Submitting to Payers Electronically or via Paper
Submitting a claim is not the end of the billing process—it’s where adjudication begins. Whether a provider submits electronically or on paper, formatting errors, missing data, and mismatched payer information can all halt progress. The goal isn’t just to submit—it’s to ensure first-pass acceptance. Submitting clean claims the first time maximizes cash flow and reduces the administrative burden of follow-ups or appeals.
Clearinghouse vs. Direct Submissions
Most providers use a clearinghouse to submit claims. This third-party intermediary checks each claim for errors before routing it to the appropriate payer. It acts as a pre-screener, running scrubbers that validate code combinations, payer formats, NPI matching, and coverage alignment.
Benefits of clearinghouses:
Detect errors before reaching payers
Consolidate submissions to multiple payers
Provide real-time status updates and rejection reports
However, some large payers (like Medicare) allow or require direct submission through portals or EDI links. While this may seem faster, it bypasses an essential layer of validation. Unless internal scrubbers are robust, direct submission can increase denial rates due to missing pre-checks.
Each provider should maintain a list of payers requiring direct routing vs. clearinghouse submission—and understand the technical formatting differences between the two.
Batch Submission Best Practices
When submitting large volumes of claims, batching increases efficiency but amplifies risk if done incorrectly. Best practices include:
Sorting claims by payer and submission method (EDI, portal, paper)
Using payer-specific templates and layouts (ANSI 837 for EDI, CMS-1500 for paper)
Reviewing batch rejection reports immediately post-submission
Including all required NPI, taxonomy, and facility codes
Some claims require individual attention—such as those for out-of-network services, high-cost procedures, or secondary payers. These should be flagged and reviewed manually before batching.
Paper claims are still accepted by some payers, but they come with longer processing times and higher error rates. When used, ensure:
Clean, legible printing (black ink, no hand-written edits)
Use of red-ink CMS-1500 forms with no staples or highlights
Mailing to updated payer addresses with tracking, if possible
Submitting claims is where speed meets precision. Without both, the entire revenue cycle stalls—impacting provider trust, revenue predictability, and patient satisfaction.
| Submission Method | Key Features | Risks |
|---|---|---|
| Clearinghouse | Error checking, multi-payer support, dashboards | Subscription fees, potential delays in routing |
| Direct Submission | Faster for large payers, no third-party step | No pre-validation, higher denial risk |
| Paper Claims | Still required by some payers, manual formatting | Slow processing, prone to human error |
Follow-Up, Rejections, and Resubmissions
Submitting a claim is only half the story—following up is where money is actually made. Industry averages show that nearly 15–20% of claims are either denied or rejected on the first pass. Yet most practices recover only a fraction of those due to poor follow-up protocols, limited denial tracking, or missed resubmission windows. Strategic post-submission management turns revenue leaks into recoverable income.
Common Denial Reasons and Fixes
Denials typically stem from incomplete data, coding errors, or eligibility issues. The most common denial codes include:
M76: Missing or invalid diagnosis/procedure code
CO-109: Service not covered by payer
CO-18: Duplicate claim or service
CO-197: Precertification or authorization required
CO-29: Timely filing limit exceeded
Each of these requires a different fix:
Coding errors need documentation review and corrected CPT/ICD linkage
Coverage denials need eligibility confirmation and, in some cases, secondary payer follow-up
Authorization denials require checking if a retro auth is possible
Every denial must be logged, categorized, and assigned a resolution timeline. Too many practices treat denials reactively—assigning one-off fixes instead of creating workflows to catch repeat issues. Denial rate tracking should be part of weekly revenue reviews.
Timely Filing Rules and Appeals Process
Payers have strict timely filing windows—some as short as 30 days, others up to a year. If a claim is rejected and not resubmitted within this window, the revenue is lost. That’s why speed matters in the follow-up process.
Best practices for timely resubmission:
Create an alert system for rejections and denials within the PMS
Route denials by category to specific staff for rework
Set internal deadlines 10–15 days before payer limits
If a claim is denied unfairly, file a formal appeal with attached documentation, coding justification, and a cover letter referencing payer guidelines. Many payers provide a 60–90 day appeal window.
Appeals should include:
A clear summary of the dispute
Supporting clinical notes
Reference to policy numbers or medical necessity guidelines
Failure to follow-up isn’t just a lost claim—it’s a systemic revenue bleed. Teams that excel here treat every denial as a diagnostic tool to refine upstream processes and improve future clean claim rates.
| Denial Code | Description | Resolution Strategy |
|---|---|---|
| CO-109 | Service not covered by payer | Check coverage, file to secondary insurance |
| CO-18 | Duplicate claim or service | Ensure claim wasn’t resubmitted in error |
| M76 | Missing/invalid diagnosis or procedure code | Review documentation, correct coding |
| CO-197 | Precertification or authorization required | Submit retro-authorization if allowed |
How the Medical Billing & Coding Certification Prepares You for Real-World Claims Work
Classroom theory means little if it doesn’t translate into real-world results. That’s why the Medical Billing & Coding Certification isn’t just about memorizing codes—it’s built to make you revenue-ready from day one. Whether you're stepping into a hospital billing office, private practice, or RCM firm, the skills you acquire map directly onto the entire medical claims lifecycle.
Core Curriculum that Mirrors Industry Workflows
The certification isn’t generalized—it’s structured around real claim flow:
Patient data collection standards and intake procedures
Deep dive into ICD-10, CPT, and HCPCS Level II coding
Real-world exercises in claim creation, scrubbing, and clearinghouse uploads
Modules on denial management, appeals writing, and payer-specific rules
You’ll work with the same templates and form structures (like CMS-1500 and UB-04) that medical billers use daily. You’ll also learn how to navigate payer policies, reference LCDs and NCDs, and apply coding guidelines to edge cases where automation fails.
Most importantly, the certification teaches workflow strategy—how each step affects the next and how to spot gaps before they become rejections.
Training on Claim Accuracy, Compliance, and Speed
You won’t just code—you’ll learn to code clean. That means mastering:
Code linkage between diagnoses and procedures
The use of modifiers in multi-service scenarios
Documentation auditing and medical necessity support
Realistic time management techniques for batch processing
In high-volume environments, precision is non-negotiable. This certification emphasizes not just compliance—but speed without sacrificing accuracy. You’ll practice catching under-coded services, missed units, or modifier errors that often go unnoticed until audit season.
Software Simulations and Industry Tools
The certification includes hands-on experience with medical billing software and EHR simulations. You’ll gain familiarity with:
Claims management systems (e.g., AdvancedMD, Kareo, or PracticeSuite)
Clearinghouse dashboards and rejection resolution tools
Payer portals and EDI formats
This removes the on-the-job learning curve. When employers onboard certified professionals, they’re getting someone who understands system navigation, formatting rules, and revenue triggers from day one.
Certification = Employer Confidence
Employers don’t just want billers—they want revenue protectors. Completing a certification signals to hiring managers that you:
Understand reimbursement logic, not just codes
Can troubleshoot denials and errors without supervision
Are trained in HIPAA and compliance-aware communication
That makes you more valuable, more promotable, and more trusted with high-volume accounts or complex specialties.
In short: this isn’t academic theory. The Medical Billing & Coding Certification equips you to submit clean claims, reduce denials, and contribute to a practice’s bottom line from your first week on the job.
Frequently Asked Questions
-
A rejected claim never made it into the payer’s system due to errors like formatting issues or missing data. These are often caught by the clearinghouse and must be corrected and resubmitted. In contrast, a denied claim has been reviewed by the payer but was found invalid for reasons like incorrect coding, lack of medical necessity, or failure to meet coverage criteria. Rejected claims don’t enter the adjudication process, while denied claims do—and may require a formal appeals process. Both impact cash flow, but denials are more resource-intensive to resolve. Efficient practices treat each differently and use separate workflows to track, correct, and resubmit them promptly before timely filing deadlines expire.
-
The need for pre-authorization depends on the payer, the patient’s specific insurance plan, and the type of procedure or service. High-cost services like MRIs, surgeries, and durable medical equipment often require pre-authorization. The best way to confirm is by checking the payer’s online portal or contacting their pre-certification department directly. Many clearinghouses also provide real-time eligibility checks that flag pre-auth requirements during scheduling. Failing to obtain pre-auth—even if the service is medically necessary—will result in automatic denial. A strong workflow includes verifying authorization requirements before every visit, especially for new patients or complex procedures. Always document the approval number in the claim or EHR.
-
Common denial triggers include incorrect patient data, invalid or mismatched ICD/CPT codes, missing modifiers, expired insurance, lack of pre-authorization, and untimely filing. Payers also deny claims for non-covered services or when medical necessity isn’t clearly documented. Some denials are specific to specialties—for instance, therapy caps or frequency limits in physical therapy. Electronic claims may be denied if system fields are left blank or if formatting doesn’t match payer specs. Regular internal audits, training of front-desk staff, and automated claim scrubbers help reduce these preventable issues. A good denial management process includes root cause analysis, not just one-time fixes.
-
Follow-up should begin 10–15 days after electronic submission to verify acceptance and processing. For paper claims, start follow-up at 20–25 days. Best practice is to work an aging report weekly, focusing first on high-dollar or nearing-deadline claims. Payers typically process claims within 15–30 business days, but delays happen. Having alerts in your Practice Management Software (PMS) for unacknowledged or pended claims improves cash flow. Set internal benchmarks—such as 90% of claims paid within 30 days—to ensure performance. Claims older than 60 days need escalation or payer contact. Timely, proactive follow-up prevents denials from falling outside the filing window.
-
Top tools include claim scrubbers, which catch coding or formatting errors before submission, and electronic eligibility verifiers, which confirm insurance status instantly. Practice Management Systems (PMS) with built-in alerts for missing data or duplicate entries also help. Clearinghouses provide dashboards for tracking rejections and denials by payer, allowing trend analysis. Some platforms use AI-driven logic to flag likely denials before submission. Additionally, workflow automation tools route denied claims to billing staff for quick rework. EHR-integrated billing modules also ensure correct documentation supports the codes billed. The key is to integrate tools into daily processes—not rely on them reactively.
-
Extremely important. Modifiers clarify the context of services—such as whether they were performed on the same day, by the same provider, or in a separate setting. Without the correct modifier, claims may be denied or reimbursed at a lower rate. For example, Modifier -25 signals a significant, separately identifiable E/M service on the same day as another procedure. Modifier -59 denotes a distinct procedural service and is often misused or overused, which can trigger payer audits. Each modifier must align with coding and payer policies. Coding specialists should stay updated on payer-specific modifier rules, especially for complex or bundled services.
-
Yes, most payers allow appeals—but the appeal process must be precise. First, determine the exact denial reason using the Explanation of Benefits (EOB) or remittance advice. Then gather all required documents: clinical notes, proof of medical necessity, prior authorization, and a concise appeal letter. This letter should include the denial code, why the decision is incorrect, and references to payers’ coverage policies or CMS guidelines. Submit within the payer’s timeframe (often 60–90 days). Some appeals must be sent via mail; others are accepted via payer portals. Always document appeal submission and track responses. Appealing isn’t a gamble—it’s a strategic, evidence-based task.
Final Thoughts
The medical claims submission process is not just a formality—it’s the financial foundation of healthcare operations. Every step, from intake to follow-up, either accelerates revenue or causes costly delays. Mastering this workflow means fewer denials, faster payments, and cleaner audits. But success isn’t just about knowing the steps—it’s about executing them with precision, using the right tools, and staying updated on payer-specific requirements.
Whether you're a solo biller or part of a large RCM team, the process demands vigilance, structure, and constant refinement. With the Medical Billing & Coding Certification, you're not just learning codes—you’re learning how to protect and optimize revenue in real-world environments.
In this field, small mistakes cost big. But with the right systems, training, and mindset, clean claims can become the norm, not the exception.